Monday, April 30, 2012

BEHIND THE SCENES: Portrait Painting in Progress

I'm currently working on a portrait commission for a friend whose son has been playing hockey in Canada.  He wanted an action pose, so he sent me some photos of JJ, taken during a game.

I start with a pencil drawing, which I send back to my friend for approval.


After getting Scott's approval, I enlarge the drawing to the size that we've agreed upon . . . 


Then, I prepare the watercolor paper.  I stretch it onto gatorboard, and paint a wet-in-wet underpainting . . 


After the paper is bone dry and flat again, I transfer the drawing onto the paper, using transfer paper. . . 


Now, it's time to paint.  (First, I rub an eraser lightly over all the graphite lines, to lighten them a bit.)  I start with yellows and golds . . .


Then, I paint the reds -- very lightly . . . 


Now, for the light blues.  I also use the light cobalt blue to lay in some shadows, to start getting some form in his jersey and legs . . .


So, this is the first pass, where I get all the colors in, very lightly.  I'm not using any masking, so I need to preserve the white of the paper.


I then start painting the medium values . . . 


Stay tuned for the finished painting, and all the steps leading up to it.  I will be finishing this week, since it needs to be matted and shipped to arrive before Mother's Day!

Tuesday, April 24, 2012

BEHIND-THE-SCENES: Drawing a Face-A-Day

When drawing the faces for my Face-A-Day Project, I use a black felt pen to draw a continuous, contour line.


I usually start with the eyes, or the eye area . . . 


I draw a light pencil line from corner to corner, on both the reference pic and the watercolor paper, to give me some reference angles.


I don't draw the face with pencil first, and there's no erasing with a pen, so sometimes I draw a "wrong" line.  Obviously, I can't use this technique when I'm doing a portrait commission.


Even though I try not to lift my pen, I occasionally do.  But, I try to pick up where I left off, and connect the lines.


Then, voila!  Sometimes I'm pleased with the result -- sometimes, not.  But, it's always an enjoyable experience, and I learn something with each face.


Sunday, April 22, 2012

SKETCHBOOK ASSIGNMENT #2: CONTOUR DRAWING

A contour drawing is a line drawing that describes the outer and inner form of an object or a person.  Sounds simple, right?  But, it's one of the most important things I ever learned.


Contour drawing requires close attention and patience -- but it will improve your concentration and focus, and your eye-hand coordination (ability to draw what you see).  When contour drawing, we try to combine two experiences -- touching and looking.


Choose a simple, everyday subject, like a shoe. Or, draw yourself -- your own hand or your feet, or your face, while looking in a mirror.


You can choose any object, although natural forms will offer the most variation -- a flower or plant, a piece of fruit or vegetable.


Focus your eyes on some point -- any point -- along the contour (edge) of the subject.  Imagine that your pencil or pen point is touching the subject.  Keeping your eye on the subject, follow the contours of the objects with continuous lines -- no sketchy lines and no erasing.


Move your eye slowly along the contour of the object, and move your pencil slowly along the paper.  Try to feel that you are not just looking at it, but also touching the object with your pencil.


Look at your subject more than at your paper.  In fact, try not to draw while you're looking at your paper -- only draw while you're looking at your subject.  Take your time -- don't be impatient or too quick (just the opposite of gesture drawing).


Occasionally, the contour line you're drawing may leave the edge of the subject and eventually come to an end.  Then, glance at your paper, and choose another point to start again.  Or, when you come to a point where one object or part of an object disappears behind another, stop.  Then, begin drawing the visible contour of the overlapping shape.


And, don't be misled by shadows.  Your pencil should move on the edge of the form, not the edge of a shadow.


When contour drawing, don't worry about correct proportions -- that will take care of itself with practice.  Remember, the way to learn to draw is by drawing!


"A contour drawing is like climbing a mountain, as contrasted with flying over it in an airplane.  It is not a quick glance at the mountain from far away, but a slow, painstaking climb over it, step by step."  - Kimon Nicolaides


Friday, April 20, 2012

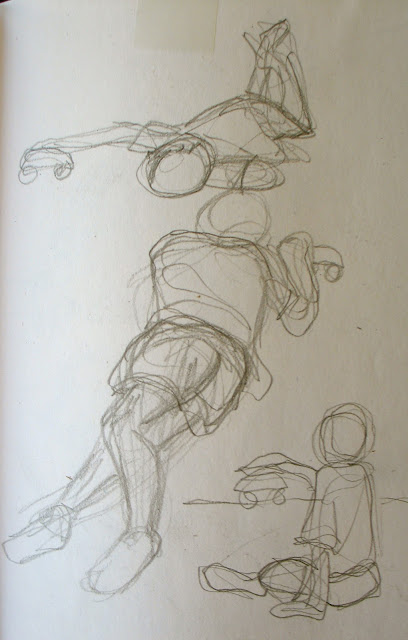
SKETCHBOOK ASSIGNMENT: TRY GESTURE DRAWING

More than just scribbles -- gesture drawings help you develop an artist's eye and help to create interesting, figurative action lines.


The secret to a successful gesture drawing is concentration and a quick hand.


The more you practice these, the better you will become. . . 


Here's the challenge -- Take less than 20 seconds to capture the gesture of each figure. . . 


Take your sketchbook and a pencil or pen and do gesture drawings anywhere -- your kids shooting baskets, a friend playing an instrument, your pet chasing a ball, children playing in a playground, people at an airport, even trees blowing in the wind . . .


Create scribbly, loose, flowing lines to capture the gesture of someone -- or some thing -- (no erasers allowed).  Think more about the expression of the "thing", rather than the way the thing looks.


In these gesture drawings, try to capture a sense of movement and life force -- ignore details!


Begin with a form of scribbling that feels natural to you.  Then, after looking at the figure, start drawing with this scribble, keeping the whole form going at once.  Don't get stuck on a part of it -- like the head or face -- try to ignore that.


Feel the pose in your own body -- even taking the position yourself -- to feel it from the inside.


Try doing some gesture drawings for a few minutes a day, every day for a week.


Wednesday, April 18, 2012

WHAT DO WATERCOLOR PAINTING AND BATHTUB YOGA HAVE IN COMMON?

Watercolor painting and bathtub yoga have 3 things in common:

1.  The Water Element, of course
2.  If you "go with the flow", you get the most benefit.
3.  I love them both.

Check out "Bathtub Yoga" for yourself -- it's for beginners as well as experienced yogis.

http://tubyoga.com
 Yoga offers at least 3 major benefits for the painter:

- Clears and centers the mind, which helps ideas and inspiration rise to the surface.
- Increases balance, which helps you focus more clearly.
- Opens your hips -- where creativity and expression may be trapped.


Tuesday, April 17, 2012

TOP TEN TUESDAY -- 10 Techniques Every Watercolorist Should Know

In every watercolor painting, you will use some combination of at least 3 of these techniques.

1.  WET-ON-WET FLAT WASH --


The entire shape is wet with clear water, then the color is added.  The color fills up the shape pretty easily.

2.  WET-ON-DRY FLAT WASH --


This wash is a little more difficult -- especially with a large shape.  It's important that your paper/board is slightly inclined, and that you have enough paint/water on your brush to make a "bead" at the bottom of each stroke.


With each subsequent stroke, you just pick up the "bead" only, as you work your way down the shape.  Never go back into what you have just painted.

3.  WET-ON-WET GRADED WASH --


Again, the entire shape is painted with clear water first.  Then, the paint is applied to the top of the shape only.  If the board in inclined, the water will do the rest of the work.

4.  WET-ON-DRY GRADED WASH --


You have more control here, but you still have to be careful not to go back into what you've just painted with your loaded brush.  Keep your paper inclined, so that you have a bead.  This time, every time you go  back to the palette, you add more water to your mixture, before adding it to your paper.  By the bottom of your shape, you will be painting with clear water.

5.  MINGLING (MULTI-COLOR WASH) WET-IN-WET --  


Paint two or three different colors on a wet surface.  In this case, the paper/board should be level.

6.  VARIEGATED WASH WET-ON-DRY --


With your board slanted, and a few puddles of 3 different colors ready, start painting a wash of one color at the top.  Rinse your brush, and then start painting with the 2nd color, picking up the bead of the 1st color.  Then, rinse your brush, and finish the painting with the 3rd color.

7.  SALTING --


Salting is a technique that gives the illusion of texture.  After painting a wash, wait until the surface has a sheen on it -- then, sprinkle some salt onto the surface.  When it is bone dry, brush off the salt.

8.  SANDING --


This is another texture technique.  After painting a wash, while it is still wet, rub the point of a watercolor pencil on a sandpaper block.

9.  RESIST/MASKING -- 


Draw some lines with masking fluid on dry paper, and let it dry completely.  Then, paint a wash over it, and let that dry.  Then, rub off the masking fluid, to reveal the white lines.

10.  LIFTING -- 


Paint a wash and let it dry completely.  Then, draw some lines with clear water -- then, blot with a paper towel.


Monday, April 16, 2012

CREATE MORE BEAUTY! MAKE BEAUTIFUL ART!

What is beautiful to you?  Discover and redefine what that is, and then make sure there's more of that in your art and in your life.

"The good is the beautiful" -- Plato

When we create things that are pleasing to our own eyes and senses, then we turn the ordinary into something extraordinary.  And, through the harmony of form and color, our art becomes more appealing  -- more beautiful.

Trust your inner voice in what you find to be beautiful -- What do YOU like?  What pleases YOUR eye? Be inspired and influenced by others, and absorb what pleases YOU.  This will turn up new definitions of beauty that will be authentic for YOU.

Discover new ways to find beauty -- 
     -  Take more trips to botanical gardens and art museums
     -  Take more scenic routes -- in the countryside and in the city
     -  Bring your camera with you on your walks and to the park
     -  Enjoy the fruit and vegetable displays at farmer's markets

Nature is always wonderful inspiration for your art.  The more natural beauty you expose yourself to, the more beauty you'll want to share, through your own creative self-expression.

"Every day, look at a beautiful picture, read a beautiful poem, listen to some beautiful music,
 and if possible, say some reasonable thing" -- Goethe

Sunday, April 15, 2012

365-DAY PROJECT -- A FACE A DAY


FACE #342 OF MY 365-DAY PROJECT, A FACE A DAY


I started drawing a face a day, last May 8th.  Each of these has been drawn on a watercolor underpainting, approx. 5" x 7", with a continuous contour line, in black ink.


I was inspired to start on this project after reading about other artists who had done something similar.  
And, I'm happy to say that my project inspired a few other people (friends and family) to take on this kind of challenge for a year, too -- Year of the Exquisite Corpse (a collaborative project), & The Daily Species:


Ren Burke's daily species can be seen at her page on Facebook -- facebook.com/birdinhandstudio.ren.burke


Drawing # 247 of Year of the Exquisite Corpse
"Weekend Getaway"

Year of the Exquisite Corpse is a collaboration between two of my sons, Zach and Ben Howard.  They take turns creating a design a day, using a piece of the other's design to start the new one.  They also use one of the previous title words in the new title.


Drawing #248 -- "Get Away From the Windows"

The name and concept for Exquisite Corpse were based on a game played by a group of Surrealist Painters back in the 1930's, where one of them started a story or a painting or a drawing, covered up all but a tiny bit of it, and then the next painter took it from there, adding to it, and then passing it along.


Drawing #249 -- "Windows are the Eyes to the World"


You can see more of these designs at 
facebook.com/pages/Year-of-The-Exquisite-Corpse